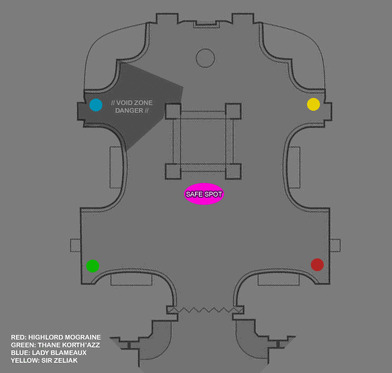
Alright, so this strategy is designed for the working version of the encounter. What I mean by that is basically working threat/taunts and correct damage on marks. I'll skip the boss abilities since we're all informed on that, and just move on to what we do.
Tanks: 4 Main tanks, 4 Off tanks.
Each OT is assigned to a MT, and that's who you'll always be relieving. The MT will always be relieving the opposite OT.
At the start of the fight, all four MTs will have each boss in the corner. You'll keep them for 4 marks. This means that the MT will be tanking the boss for 48 seconds each, and ~60 seconds at the start of the fight, plus the time in-transit for your OT to get there.
Every OT rotation will go up to 3 marks/36 seconds, plus the time in-transit for the other MT to relieve you.
Any time you are not tanking a boss you are at the SAFE ZONE and nowhere else.
Why use this tank rotation? It gives us room for error and a steady healing requirement.
RETARD VERSION: You move in a V shape for the entire encounter. Pretty difficult, right?
Healing: 15-16, any composition
First off, I just want to say that it's going to be necessary for healers to be in another channel to co-ordinate their movements. Either that, or you'll have to use vent bindings. If you decide to use bindings, let me know and I'll show you how.
The healers need to be separated into 6 teams. This means 3 teams of 3 and 3 teams of 2. If we have a 16th healer, he will sit in the safe zone and go to whatever area needs help.
Movement will be the same as our tanking rotation was before, but without the clusterfuck.
The three teams of 3 will be rotating around the FRONT side of the room with Mograine and Thane K't. The three teams of 2 will be rotating in the back with Zeliek and Blaumeux. Since you are going to 3 marks and tanks are going to 4, this means that you'll be moving at different times the tanks, so don't try to follow one.
Using this rotation means that there will usually be 5 healers at the safe zone, so you may go onto the other side's bosses to help heal as long as you are ready to transition to your boss when others start moving.
For the FIRST rotation, we're going to have all the healers at the safe zone start the rotation when the first mark is applied. This is so that nobody has to go higher than 3 marks as a healer.
We need to designate one healer in each of the 3 man teams with a mark for other healers and DPS to follow.
DPS: Derp mode, god it's really easy to not mess up.
The DPS needs to be split into 3 teams for Mograine/Thane K't. Have each team follow one of the marked healers. Remember to move together and stack on the boss.
At 50/20%, when they cast Shield Wall, do NOT break the rotation. Continue as normal, wand for mana or drink a Dreamless Sleep potion if you want. But do not break the rotation. As soon as someone separates from the group, Thane starts killing people.
If Thane and Mograine don't die at the same time, be sure to not go near whichever is dead, as they will still cast all their abilities while rooted in place.
For DPS waiting in the safe zone, don't go near the bosses in the back, you'll just cause problems.
When Thane and Mograine are dead, start rotating on the rear two bosses. Blaumeaux and Zeliek MUST die at the same time, or one will enrage and wipe the raid. Melee DPS doesn't go near Zeliek, ever.
When they are at 10%, all DPS will go to the safe zone and be split into odds and evens, depending on who is still alive. When the DPS is sufficiently separated, we'll go in and do the final burn. After the 4th mark you'll take a Shadow Protection potion. If they are sufficiently nerfed, 10% should be 160,000 HP or so and the burn phase should only last about 30 seconds.
Properly executed should mean a relatively easy Four Horsemen kill. Let's get some chest pieces.

 Board Statistics


 Mon Aug 13, 2012 5:51 pm
 Private
 Visitors